Prerequisites: Google Gmail API Setup
If you spend 30 minutes every morning sorting through email, let’s automate that. For Claude Code to access Gmail, it needs a “key.” You’re creating a permission slip from Google that says “this program may access my email.”Set it up once and use it forever.
No coding experience needed
You won’t write any code in this exercise. Give Claude Code a single prompt and AI handles everything. You just review the results and approve with y/n.
Do I need an API key?
No! Many people worry about “do I need to generate an API key?” but no API key is required. All you need is one thing called an OAuth Client ID. Create it, log in with Google once in the browser, and you’re done.
There are two methods. Choose the one that fits your situation.
credentials.json Method
The traditional approach. Claude Code writes Python/Node code that calls the Gmail API directly. Just place the credentials.json file in your workspace folder.
Universal · All OSGWS CLI Method
A CLI tool released by Google in 2026. Manage email directly from the terminal with gws gmail commands.
Common Step: Create an OAuth Client ID (one-time)
This process is the same for both Method A and B. You only do it once.
Go to Google Cloud Console
Open console.cloud.google.com in your browser. Sign in with your Google account.
Create a project → Enable Gmail API
Click “New Project” at the top (any name is fine). Then go to “APIs & Services” → “Library” in the left menu, search for “Gmail API,” and click “Enable.”
Configure OAuth consent screen + add test users
Go to “Google Auth Platform” (formerly OAuth consent screen) in the left menu. Under the “Audience” tab, select “External,” and add your own Gmail as a test user. If you skip this, you’ll get an “access_denied” error later.
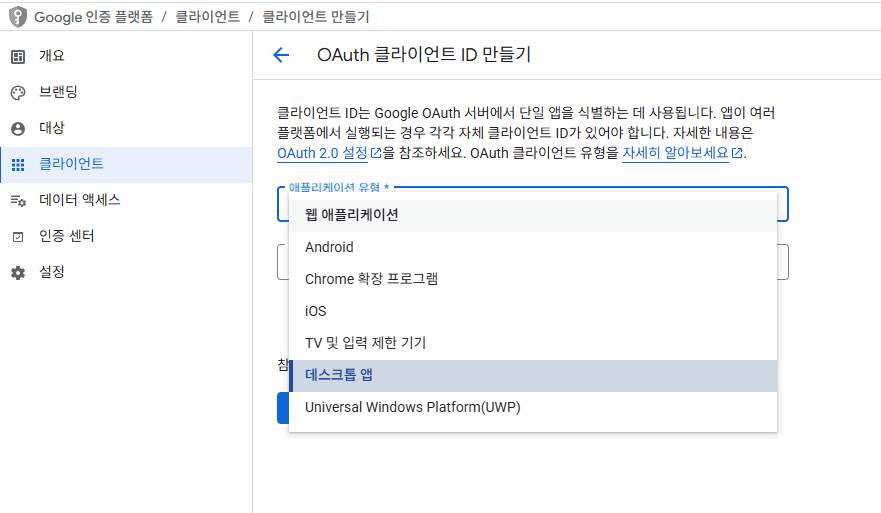
Create OAuth Client ID
“Clients” tab (or “Credentials”) → “Create OAuth Client ID.” For application type, select “Desktop app.”
Download JSON
After creation, click the “Download JSON” button. This file is your “key.”
You can automate this process with Playwright
Remember the Playwright installed in Step 4? You can actually automate the Cloud Console setup above with Playwright too. Try telling Claude Code:
“Use Playwright to go to Google Cloud Console, enable the Gmail API, and create an OAuth Client ID”
Claude Code will automatically open a browser and handle everything from project creation to OAuth setup—without a single click. You just enter your Google login password.
Note: Google may block automated tool logins, so it’s more reliable to handle login manually and let automation take over from there.
Acredentials.json Method
Rename the downloaded JSON file to credentials.json and put it in your workspace folder. That’s it!
~/Desktop/autowork/credentials.jsonClaude Code reads this file and automatically writes Gmail API connection code. On first run, a browser opens asking for Google login. After logging in, a token is saved and subsequent connections are automatic.
BGWS CLI Method (Google Workspace CLI)
A CLI tool released by Google in 2026. You can manage Gmail, Drive, Sheets, and Calendar directly from the terminal. It even supports an MCP server mode for direct Claude Code integration.
Installation
# 1. Download gws.exe from GitHub Releases
#    github.com/googleworkspace/google-workspace-cli/releases

# 2. Copy gws.exe to npm global folder
#    Usually: %APPDATA%\npm\gws.exe

# 3. Verify in terminal
gws --version
Windows npm install error?
Running npm install -g @googleworkspace/cli on Windows may produce a tar error. In that case, download gws.exe directly from the GitHub Releases page and place it in the npm global bin folder. Delete any existing gws.cmd and gws.ps1 files created by npm.
Authentication (Login)
Rename the downloaded JSON file to client_secret.json and place it in the GWS config folder.
# Copy JSON file to GWS config folder
# %APPDATA%\gws\client_secret.json

# Login
gws auth login
A browser opens with the Google login screen. Log in and you’re done!
Test
# Fetch Gmail message list
gws gmail users messages list --params '{"userId": "me"}'
If a list of message IDs appears, it’s working. Now you can use GWS CLI from Claude Code.
Common Issues & Solutions
access_denied error
If you see “The developer has not granted you access”, you probably missed adding test users. Go to Google Cloud Console → Google Auth Platform → Audience tab and add your own Gmail as a test user.
Even if you see an “ineligible account” warning, it usually works. If it shows up in the list, you’re good.
Test mode token expiration
Tokens in Google OAuth “test mode” expire after 7 days. After 7 days, you’ll need to log in again. Switching to production mode removes this limit, but for personal use, re-authenticating every 7 days is no big deal.
Feeling overwhelmed?
Google Cloud Console is naturally confusing if it’s your first time. But don’t worry—you can ask Claude Code for help!
Launch Claude Code in the terminal and ask:
“Walk me through setting up OAuth for the Gmail API step by step”
Follow along on your screen. Keep asking about anything unclear.
Execute Now
Once credentials.json is in your workspace folder, it’s time to let Claude Code do the work. Launch Claude Code in the terminal (claude), and enter the prompt below exactly as shown.
Using credentials.json,
automate Gmail.
Sort emails, mark newsletters
as read, draft replies for
important work emails.
Save to emails.json.
That’s all there is to it.
With one prompt, Claude handles everything below automatically.
What Claude Does Automatically
Reads credentials.json and auto-generates OAuth authentication code
Fetches emails from inbox and classifies as Work Important/Newsletter/Notification/Other
Marks non-important emails as read automatically
Analyzes email content and AI composes appropriate responses
Shows the draft and saves to Gmail Drafts folder on approval
Records classification results and processing log as a JSON file
Claude Code subscription required
Using Claude Code requires a Claude subscription. No complex API key setup needed—just subscribe at claude.ai.
Recommended plan: Claude Max ($100/mo) — Generous Claude Code usage lets you work through automation projects comfortably. You can start with Pro ($20/mo), but heavy exercise use may hit usage limits.
Gmail access via MCP is also possible
If OAuth setup feels cumbersome, you can use a Gmail MCP server instead. MCP (Model Context Protocol) is the standard way Claude Code connects to external services. Connect a community-built Gmail MCP server and access Gmail without OAuth setup.
Want to learn more about MCP? Ask inside Claude Code: “Show me how to set up an MCP server.”
Check the Results
After entering the prompt, Claude Code writes and executes code. You’ll see output like this in the terminal.
Stage 1: Email Collection + Sorting + Auto Read
📧 Starting Gmail automation...

✅ Gmail API connected successfully
📨 50 emails collected

📊 Classification results:
  Work Important : 8
  Newsletter     : 22
  Notification   : 15
  Other          : 5

👁️ 22 newsletters marked as read
👁️ 15 notifications marked as read
Stage 2: Draft Approval Screen
✏️ Drafting replies for important work emails...

━━━━━━━━━━━━━━━━━━━━━━━━━━━━━━━
📩 From: team.lead@company.com
📋 Subject: Please confirm the March project schedule

📝 Draft reply:
"Hi,
I've confirmed the March project schedule.
I'll share the updated timeline along with
current progress by Friday.
Thank you."

💾 Save this draft to Gmail? (y/n): y
✅ Draft saved!
━━━━━━━━━━━━━━━━━━━━━━━━━━━━━━━

📩 From: marketing@company.com
📋 Subject: Meeting materials request for next week

📝 Draft reply:
"Hello Marketing Team,
I'll prepare the requested meeting materials.
Can I share them by Monday morning?
Let me know if you need anything else."

💾 Save this draft to Gmail? (y/n): y
✅ Draft saved!

━━━━━━━━━━━━━━━━━━━━━━━━━━━━━━━
📊 Final results:
  Emails processed: 50
  Marked as read: 37
  Reply drafts: 8 (8 approved)
  Saved: emails.json ✅
What the human did
1 prompt + a few y/n clicks
What AI did
Everything else
Understanding: The 6-Stage Automation Pipeline
Let’s understand how the automation you just ran works internally. It follows this 6-stage structure. It looks complex, but remember—you already ran this entire thing with a single prompt.
Collect
Fetches the latest 50 emails from your inbox via Gmail API. Reads sender, subject, and body content.
Gmail APIClassify
AI analyzes each email and automatically sorts into 4 categories.
Mark as Read
Emails classified as Newsletter and Notification are automatically marked as read. No more clicking through them one by one.
Auto-processed (no human involvement)Draft Replies
For each email classified as Work Important, AI drafts a reply. Analyzes the email content and auto-generates an appropriate response.
AI draft generationApprove
AI-generated drafts are never sent immediately. The draft content appears in the terminal, and only when you press y is it saved to Gmail Drafts.
Schedule for Recurring Runs
Register the completed script to run automatically every morning. Set it up once and email sorting is done before you arrive at work every day.
cron / Task SchedulerKey point
You don’t code these 6 stages yourself. Give Claude Code a single prompt and it builds the entire pipeline automatically.
3 Formulas for Great Prompts
How you write your prompt to Claude Code significantly affects the results. Just remember these 3 formulas.
Formula 1: Specify the filename
| Bad | Good |
|---|---|
| ❌ “Analyze this file” | ✅ “Read sales.csv” |
| ❌ “Clean up the data” | ✅ “Open report.xlsx” |
Being specific about which file lets AI execute immediately.
Formula 2: Specify the output
| Bad | Good |
|---|---|
| ❌ “Organize this” | ✅ “Save as summary.xlsx” |
| ❌ “Analyze this” | ✅ “Create report.html with charts” |
When you specify the format and filename of the output, it saves exactly as you want.
Formula 3: Iterate and refine
It doesn’t have to be perfect the first time. Review the result and ask for changes.
Prompt Formula
[File/Context] + [Desired Processing] + [Output Format/Filename]
Example: “Read sales.csv, aggregate by department, and save as summary.xlsx”
Try It Yourself
Time to run it yourself. Follow these steps.
Execution Steps
Navigate to workspace folder
Go to the folder containing credentials.json.
Launch Claude Code
claudeEnter the prompt
Using credentials.json,
automate Gmail.
Sort emails, mark newsletters
as read, draft replies for
important work emails.
Save to emails.json.Watch the process
Watch Claude write and execute the code.
Approve reply drafts
When drafts appear, respond with y or n.
During execution, note the following
- A Google login window will appear — On first run, a browser opens with the Google login screen. Click “Allow.” If you see an “unverified app” warning, click “Advanced” → “Continue.”
- y/n is your choice — If you like the draft, press y. If not, press n. Pressing n is totally fine—it just won’t save to Drafts.
- Don’t panic about errors — Claude Code automatically analyzes errors and fixes them. Just wait and watch—it resolves itself in most cases.
Verification Checklist
Having trouble?
The most common issue is the credentials.json file location. Double-check the file is in your workspace folder.
If it still doesn’t work, ask Claude Code: “Find the error and fix it”
Set Up Daily Auto-Execution
Once the automation script is ready, you can set it to run automatically every morning. Register the Python script Claude Code created with a task scheduler.
Ask Claude Code like this:
Register this script to run
automatically every morning at 9am
Claude Code will auto-detect your OS and set it up accordingly. If you want to do it manually, see below.
OS-specific scheduling
# Using Windows Task Scheduler
# 1. Start menu → search "Task Scheduler" → open
# 2. Click "Create Basic Task"
# 3. Name: "Gmail Automation"
# 4. Trigger: "Daily" → 9:00 AM
# 5. Action: "Start a program"
#    Program: python
#    Arguments: gmail_auto.py
#    Start in: C:\Users\PC\Desktop\autowork
# 6. Finish

# Or register via PowerShell in one shot:
$action = New-ScheduledTaskAction `
  -Execute "python" `
  -Argument "gmail_auto.py" `
  -WorkingDirectory "$HOME\Desktop\autowork"
$trigger = New-ScheduledTaskTrigger `
  -Daily -At 9am
Register-ScheduledTask `
  -TaskName "GmailAutomation" `
  -Action $action `
  -Trigger $trigger
Let Claude Code handle scheduling too
If the setup above seems complex, just tell Claude Code “schedule this to run every morning at 9am.” It auto-detects your OS and sets it up.
Recap
Gmail Automation Flow We Built Today
Human effort: 1 prompt + a few y/n clicks
AI effort: Everything else
No coding required. The 30 minutes you spent on email sorting every day is now automated.
Beyond Gmail?
Use the same approach to automate Excel aggregation, PPT creation, and more. Got a weekly Excel task you repeat? That can be solved with a single prompt too.